


I haven’t posted for a while, so as a consequence this one is, erm………………..you guessed it !!


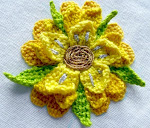
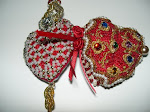
This is a 3-d calyx I stitched and attached to a doodle flower that’s similar to one of the motifs on the Bag. It was made in a strip, like the ruffle row of petals made earlier, and pulled together to form the collar, as they have on the historic Sweetbag. This post starts off discussing the construction of this flower component but ends up looking at 2-d embroidery issues.
___________
The book is virtually finished – well at least its out of my hands for the time being.
The DIY is going quite well, a new power tool helps, but the rain certainly doesn’t. Still, we badly need rain, so far be it from me to complain.
And we just returned from the ancient city of Pompeii. What an amazing place that is! Can you imagine walking round a genuine archaeological dig that was once the holiday town for rich Romans, with its gymnasium for general citizens, more than 25 fresh water public fountains, hot baths, a steam room, a fish and chicken market, countless shops selling hot and cold wine and incredible mosaics galore. I might do a post about it??
______________
Detached Buttonhole Shapes continued
I’m not quite ready to post ‘the pattern’ yet, as it’s going to be quite involved (picture heavy, text light) and has given rise to a whole new set of questions I am asking myself which have, um, distracted me…
3-d Triangles and Circles
Meanwhile, I have been practicing more shapes to put the pattern through its paces:

As you can see, these triangles deal with ‘extreme’ increasing and decreasing. Unlike knitting, the stitches held on this convenient little wooden needle, represent the starting row.
Then, in an effort to leapfrog to a point of better understanding, I set myself the task of embroidering a circle. Anyone reading this knows that I always select circles as a way to really work out if things are going as they should. As with drawing, a circle is a good thing to practice doing to help you improve shaping techniques.

Made from counted increases, then 4 rows of even-shaping, followed by counted decreases.
One thing is for sure, whatever shape you want to make, it’s essential that your straight stitch return row, or cord row, is as loose as you can make it because if it is too tight, the shape will pucker very quickly in your hands.
All these little shapes are quite difficult to photograph incidentally, as they quickly become very curly, like this:

Another Way to Embroider Flowers
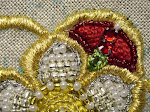
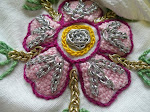
I should mention that the flowers made on The Bag are unlike the flowers on this delightful embroidered posy c.1750 – 1850, that I managed to photograph at The Ashmolean recently:

These were made using a curvy-linear technique that is similar to couching with Detached Buttonhole, whereby you are constantly turning the work to change direction. Later on, this technique was adapted by the nuns in Ireland, who had seen Venetian lace, to produce their famous Irish Crochet.
In contrast, The Bag I’m looking at is made with a straight stitch return row that means you do not need to turn the work at all and yet all the stitches are facing the same way (slightly left, if you are left handed or visa versa for right) .
In the book Sweet Bags, the author discusses this curvy-linear technique in detail but she does not talk about Detached Buttonhole (DBH) stitched back and forth very much, except to say that the Elizabethans worked the stitch ‘away from themselves’. (She does however, discuss corded Trellis stitched back and forth.)
One of the main differences between the two techniques is that with DBH as worked on The Bag, you can create sharper points than you can with the curvy-linear style and that means a greater variety of shapes.
From Triangles to Spears
So, the various patches of practice triangles made me impatient to see how effectively I could alter the shaping to produce a more complex 3-d Calyx, of which there are quite a few on The Bag and most of them are very elongated. I chose a wide one to start with (pictured above) and experimented with its shaping, using a wide crochet cotton.
Understanding how they made the Calyx was quite straightforward. Basically you stitch it in a strip on a long tack stitch, that is then removed and gathered to form the collar. This is then folded into place to show off the collar or suggestion of it, but the two outer points are flattened out and stitched into place. That was the easy bit…
Defining the narrow central spear correctly proved much more difficult when I switched to finer thread. Its the last part of the design and has to be made long enough to be placed over the underlying petals and hold them in place, as I have done in the demo.
The solution in evidence on the bag is to do this:

To form this flower:

As you can see, working with a width of 7 tiny 3-d stitches stitches in your hands was very awkward and I could see I would need to come down about 10 rows.
From 3-dimensional problems to 2-dimensional solutions
Then it struck me that perhaps the central spear was not in fact made 3-d after all, but stitched after the collar was in place, directly over the underlying layers of DBH mini fabric, as a way of securing all the applied shapes and also to enable one to make that section of the flower component completely made-to-measure, in situ?
So I made another central spear in isolation but this time I stitched it directly onto the fabric, it can be seen below on the left hand side of the image. Its a lot wider than it needs to be but it got me thinking……

I then decided to try and see just how narrow I could make the shape by stitching DBH flat and came up with this:

You might be thinking what is so unusual about this shape?
In short, it has no preliminary framework e.g. a cordonnet of chain stitches, reversed chain or even back stitches. Nor does the one above. So from 3-d I made a transition to 2-d with what I know now about 3-d, if you know what I mean, and it worked.
Personal Research made of 2-d Historical Embroidery
Then I remembered something I had noticed on some digital close-ups of historic needlework that made me wonder back then, that perhaps they did not have to use a framing shape before stitching everything in those days, after all?? Or maybe some shapes were and some weren’t, depending on the required shape???
Now this is quite a controversial idea, to say the least, but it links in with my own recent, better understanding of what you can and cannot do with DBH, that I’ll go into further when I discuss ‘the pattern’.
Dilemma of Pointed Tips on Flat Work
To put it another way: when the shapes we need to make are more slender or pointed that the usual types, a framework can be seen, perhaps, to add unnecessary bulk to inner corners, where the shape would need to decrease to a very fine tip? Also, we need to think about when the pointed shape ‘bends’ in one particular direction, like this shape:

Watching the direction of DBH rows on Historic Examples
If you study historic examples, when the shape turns or bends, the lines of stitches remain straight, whereas if you stitch into the inner loop of say a chain stitch, the horizontals of DBH turn with the shape. But something else is happening….
Cordonnets Use Up Valuable Space
Its not so much that you cannot make a cordonnet into this type of shape, in my view, its that the number of chain stitches on either side of the pointed section cannot fit comfortably round a sharp angle and simultaneously accommodate many lines of DBH stitching within it, without inadvertently smoothing the point out into a curve. In short, points can be lost! If points are lost then, in my view, a whole chunk of aesthetic appreciation of this type of work might be lost too…
The Stem Stitching Convention
So I went back and looked again at the close-ups of extant items and found evidence of stem stitching round completed shapes and examples of other shapes without any stem stitching, that are left ‘unframed’.
To say that they stem stitched round completed shapes is not unheard of and I have seen it mentioned in authoritative descriptions of historic work.
Do All Shapes Actually Need to be Smoothed Out?
To our eyes, perhaps, you would need to do something to the outer edge of most shapes to bring the design together and smooth out any uneven lines of stitching?
However, on one particular Coif I have been looking at, the DBH work is so small they have left the shapes ‘unframed’.
Evidence of Tiny Legs Could Indicate Shapes that are made without a Preliminary Framework?
There is another reason why I think they used stem stitching in this way, and that is to conceal the tiny legs that can result from stitching directly.
These ‘little legs’ (they are hard to see but are there) might even be seen as proof that they worked in this way? In contrast, in a modern context, when we use a chain stitch framework, there are never any little legs visible.
There are other differences between both methods but I cannot go into more than a few at this stage, save to say, by its very nature, stem stitching is more ‘linear’ than chain stitching, which is very curved and I see it most often used on leaves and more complex flower motifs.
An Important Difference Between Elizabethan Detached Stitches and European Classical Needlelace
The point I am making is not so much how and when they completed their stem stitching but dare I say, do we actually need a preliminary framework of stitches at all on which hinge this type of DBH work??
The purpose of a classic cordonnet is to define and hold a shape in place while it is being made, so that when you cut it away it will maintain its shape. In this way, the needlelace rests on the top, to be cut away later. That way it will become a new layer of freestanding and independent fabric. Elizabethan embroidery is not cut away like this and the two layers remain related.
Furthermore, if the cordonnet is basically a kind of ‘mini loom’, thereby stretching and holding the stitches in place, the tension the slate frame produces itself is already providing that foundation…
Examples of Working in an Alternative Way
So far I have seen examples of stem stitching around finished shapes that are:
- carried out in a different colour.
- Other times its used to frame metallic DBH work that was stitched directly into the fabric.
- At other times its used when creating shapes with various colour changes.
- The stem stitching can be seen most clearly on shapes that have little legs poking out, and I suggest the little legs could well indicate that the DBH was stitched directly, without a framing shape made first.
_________
Now with all this in mind, I go back to the notion of creating pointed shapes and simultaneously investigate how they might have close stem-stitched round them.
My Own Experiments with Both Methods
Here are some pictures of my first attempts to compare both methods of working:

Above are 3 ways to make this kind of pointed shape. Already you can see that the stitch length on a row of DBH is greater than the length of an individual framework stitch (on the right), yet if you made them the same size, the structure would not tension correctly.
Yellow Petal
The yellow petal has been framed subsequently with stem stitches. Notice how this gives the appearance of the outer ‘ridge’ of stitches being the ‘higher’ row, while the rest of the work remains flat. The shape is also stuffed full of stitches. This shape too, was made without a cordonnet, having pierced the fabric only at either end of a row.
The Green Petal in the middle
The green petal in the middle, has no stem stitching round it yet. This shape was also made without a cordonnet. Fabric pierced only at either end of each row.
Green Petal on the Right (above)
This shape represents the usual way to make DBH shapes and consists of approximately 39 tiny back stitches. I chose back stitches as they add least bulk.
Now this is where things take a different turn. Below you can see the cording row will rest above a line of stitches and be incorporated into the next row of buttonholing, in the usual manner, but the problem is that, at either side it turns and rests on the surface, thereby restricting the available space for more stitches. This peculiarity means that it adds significantly to the overall size/moulding of the shape.

The result is, in my personal view, that in practice, it is quite hard to make finely pointed shapes with a preliminary framework of back stitches, even though back stitches are the smallest foundation stitches you can make, because the turning thread rests on the top of the work. Here it is completed:

So my next experiment was to try and work out how they might have stem stitched so closely and consistently round the edge of the finished shape?
First thing to consider is the piercings that DBH makes in the fabric:

As you can see above, the rows of DBH ascend in tiny pairs that are not absolutely parallel because the cording row sits higher one side than the other.
So I concluded that the closest edge of stem stitching you can create, is to actually go into the sides of the pairs of DBH rows themselves and this is what it looks like when you do this:

I stem stitched into the 2 little feet of DBH rows all the way round. The points were easy to find if you pull the stitching down and out of the way a bit. This means that the stem stitches remain as even as the work. This is another similarity that I can see on historic pieces.

The other thing that’s significantly different about working this way is that you can work A LOT faster!
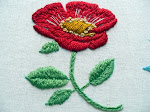
So with these new observations I decided to make a ‘pointy’ Borage:


I’ll discuss this some more next time….must dash !


WOW I can't even imagine doing this!! It's really wonderful/amazing how you can figure historical embroidery out!!
ReplyDeletePhenomenal job! Although I am not that kind of embroidery do, but your designs really have much in common with Irish lace. Your designs can be used for knitting the Irish elements. This is very interesting. Thank you very much.
ReplyDeleteAnd forgot to write: very interesting to see your report on the trip to Pompeii.
ReplyDeleteThank you ladies!
ReplyDeleteShirlee
I meant to reply earlier but Blogger is being weird...
Lots of zooming with the new Big Mac screen - to be sure!
,
Glad you mentioned Pompeii Tatiana
It was out of this world!
My advice to anyone planning to visit is wear good walking shoes as three of our group unfortunately fell over!
The road surface is made of quite large smooth stones and they even had 'speed restricting' bollards, over which you could see the deep impressions made by countless chariots squeezing through over the years.
It is eerily quiet there, even though so many people visit at any one time.
There is definitely an atmosphere, as you can imagine, very sad event.
They were just so incredibly advanced...as our guide said, "they invented everything - except Facebook !!!"