


To fully understand this post you’ll need to take a look at earlier posts regarding Plaited Braid Stitch experiments. (This is not a short post by any means….)
Continuing: Where did Plaited Braid Stitch (PBS) come from?
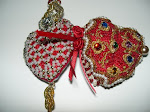
In a dreadful rush here. Just to say that I have compared the two braids and here are the pictures.
GinaB cleverly spotted that PBS 3-d braid looks very similar to Lucet braid and so I took that idea as the basis for this next experiment.
Lucet Braid nitty-gritty
I found the instructions of how to make a Lucet, which is a thin square braid, in Jan Messant’s Celtic, Saxon and Viking Embroidery book. Although it’s not a book about technique as such, it does include full instructions on Lucet. There is also a good video on YouTube about how to make this braid that you can find here.
It would seem however, that there is some confusion about how to start it off. (I find that very interesting because PBS is also a stitch that has had people confused about how to start it.)
To work Lucet
A Lucet Fork/Horn is usually made of polished wood. It is another Viking introduction to England. For more advanced braids you would use two of them slotted together to create a fork with 4 prongs.
To start the braid off, you begin by wrapping the thread round the 2 prongs of the Lucet, in a classic number 8-shape.
I didn’t have a Lucet Fork to hand, so I did the next best thing and utilised a disposable plastic one. To do this I simply snapped off the two middle prongs and covered their stumps with black Duck Tape.
After the initial figure 8-shape, you wind the thread round the fork, in a circle, lifting each loop up and over the working thread as you go round.
You continue going round and quite soon the braid starts to form and work its way downwards, in front of the fork.
Its really fast to make and self-tensioning. This type of braid is described as being made up of a series of little knots. (I also find that very interesting.)

Below is the number 8-shape. See how you keep hold of the start with your thumb, while winding the thread round.

This next picture is particularly interesting because if you peer in there you can see there is a kind of ‘Pretzel’ shape between the two prongs (fascinating! as that’s another feature it shares with PBS braid).

The rest is child’s play, you simply pass the thread round and lift the loop over it. The tips of this fork tend to snap off, so unless you cover those with Duck Tape too, you’ll need to take care not to snag your thread as you go over them.

Below its viewed from the top, as you can see it ‘appears’ almost exactly the same as the PBS braid (pictured later in this post). However, there is one crucial difference that I noticed when I came to unravel both braids…


I turn the fork as I work round, so that I’m always lifting only one side but you can also keep the fork facing you and lift each side alternately.
_________________
Lucet Braid Unravelled
OK, here begins the sequence of unravelling. The purpose of this is to compare and contrast (remember that phrase!) both braids. As you can probably tell, this type of braid can be undone easily and quickly. (Unlike PBS braid.)


As you’ve no doubt noticed, it works up like the rungs of a ladder with 2 ‘side-to-side’ chain stitches that create the illusion of 4 chain stitches bunched up. In fact it is only ever made of 2 chains that are pulled together tightly.
Although Lucets are a Viking introduction, my guess is this type of simple ‘chain stitch braid’ was probably made using just the fingers or maybe a crude needle of some description. Ancient braids were made of animal sinews or grass and later on, leather cords. It has recently been scientifically proven that human beings have been wearing clothes for 170,000 years!
What’s particularly fascinating from learning about the Vikings is that they had tremendous respect for Stone Age man and especially liked to own something from those times as they considered them lucky and would often bury that kind of artefact under their houses as they built them.
_________________
Plaited Braid Stitch 3-d braid Unravelled
As seen before, here is this classic embroidery stitch but this time formed round a supporting makeshift rod.
(Why did I do this? Because in the book ‘Sweet Bags’ by Jacqui Carey, the author likens the stitch to a “4-ridge twill braid”.)

Then its pulled into shape slightly, and you can clearly see below how very similar both square braids are.

Here I started to take it apart.

You can see the predictable ladder construction again. At this stage, the structure of both braids looks very similar..


However, at every other row, you see things take a different direction.
Notice how in this section the thread does something extra, as it has passed directly INTO the loop on the left. Every other row has this ‘extra’ feature and this is the fundamental difference between both braids.

Below is the same step, pictured a little later and from a different angle.

Below you can see you really need to be very deliberate in pulling the thread up and out of this loop stitch, as the braid will not unravel otherwise.
This is distinct from the Lucet, as that will unravel smoothly.

Conclusion? I don’t yet have one, if I ever will (?) but I think it was worthwhile exploring the core mechanics of both braids as they do have a lot of similarities.
You’ll be interested to know I’m not yet finished with Ye Olde PBS (I hear you gasp!) and I’ll discuss more next time. (Especially as one of the books I was waiting on has arrived !!).
_____________________
I will need to clear my decks first though, as I’ve taken on extra work that I have to complete very soon. I’m afraid all my recent ideas have to be put on hold until this ‘job’ is done.
Basically I’m editing a book to send to the publishers (24 chapters!). Its for a friend, so it was impossible to say no (believe me I tried!). There are plot changes, syntax and grammar problems plus continuity errors, the list goes on. In short I’m having to virtually re-write it and its now in its nightmarish phase where I cannot split my focus anymore and must bash it out.
______________________
Bird Bag
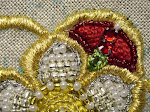
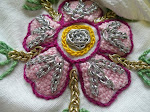
However, on a different topic, before I give over the next 4 weekends (at least) to the book, I decided the birds needed a radical rethink as they were looking kind of ‘undressed’.
So I decided I’m going to stuff them using Trapunto technique and then dress them with Hollie Point Stitch.
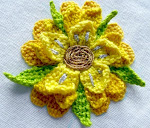
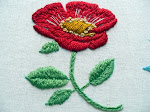
For the flowers I’m using Broiderie Perse ideas.

In short, what I thought would be a ‘quick project’ is turning out to be another quasi-stumpwork-type-thing, with lots of tiny stitches and plenty of choices to be made…
I found a good short article on the history of Broderie Perse and its pitfalls, here.
Blue & White Digression
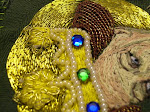
Before I go, maybe its because I’m a bit fed-up of winter’s grey skies, but the little birds project has a lot of blue in it. So I thought I’d to show you my recent dinky purchase.

The fact that I bought this proves what they say, that: ‘Art devours art, only to regurgitate itself later’. Because its a piece of pottery, based on a textile, that’s influencing my humble Valentine bird textile…. !
The Museum has obviously endorsed this chinaware design and can you believe I picked it up at my humble local supermarket !!!
You can purchase them direct from ‘Creative Tops’ here.
A real piece of history for under £5.00 !
On the topic of Blue & White, I wonder if anyone out there knows what this is ?…

Incidentally, this brings me to the reason why I take my museum visits very seriously.
To Digress ever so slightly…..
I bought this from a lady who ran an antique shop near the Elizabethan house called ‘Hengrave Hall’ in Bury St. Edmunds. Its listed in all the architecture books concerning that period.
We were staying in the Hall at the time. (That sounds terribly grand doesn’t it?) Actually anyone can stay there, as its a religious retreat run by nuns (I don’t know the name of the Order) and promotes inter-faith workshops and stuff.
The house retains all its original oak panelling, huge fire places and mini chapel etc etc, but Thankfully they have installed central heating! I think there is also a Saxon tower in its grounds – if I am not mistaken?
A-n-y-w-a-y, the antique shop was closing down and I took pity on this item, especially after I was given a (tantalising) hint of its provenance.
Intrigued, I had it valued by an antique dealer in London (not one of the big ones!), who was unable to tell me what it was and guessed it was some kind of vase?
Unimpressed and unconvinced I kept an open mind and low and behold, when I visited the The Rijks Museum in Amsterdam a couple of years later, what did I see?…..several of these little things all lined up in their own display case, proudly showing off roughly the same hand painted oriental flower design….cool or what!
Amazing fact-o-file: Blue & White china did not originate in China, it was actually copied by Chinese craftsmen from early Persian ceramics.
Goodness, is that the time??


